J-Link RTT Viewer
J-Link RTT Viewer is a GUI application to use all features of RTT in one application.
Available for Windows, macOS and Linux, it is included in the J-Link Software and Documentation package.
It is free with any model J-Link or J-Trace.
Overview
J-Link RTT Viewer is the main GUI application to use all features of RTT on the debugging host (Windows, macOS and Linux). RTT Viewer can be used stand-alone, opening an own connection to J-Link and target or in parallel to a running debug session, attaching to it and using this existing J-Link connection.
For a complete documentation of J-Link RTT Viewer refer to the J-Link User Manual (UM08001), Chapter RTT.
Key features
- Terminal output on Channel 0
- Sending text input to Channel 0
- Up to 16 virtual Terminals with only one target channel
- Controlling text output: Colored text, erasing the console
- Logging data on Channel 1
Licensing
The J-Link RTT Viewer comes as part of the J-Link Software and Documentation Package. The software package is free for any J-Link or J-Trace device and can be downloaded here:
System requirements
| Supported OS | |
|---|---|
| Windows | Microsoft Windows (x86/x64) |
| macOS | macOS (x86/Apple Silicon) |
| Linux | Linux (x86/x64/Arm) |
RTT Viewer Startup
Make sure J-Link and target device are connected and powered up.
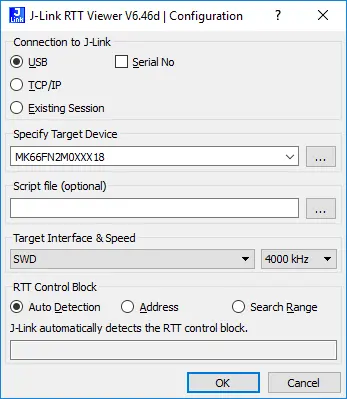
Start RTT Viewer by opening the executable (JLinkRTTViewer.exe) from the installation folder of the J-Link Software or the start menu. The Configuration Dialog will pop up.
Configure the Connection Settings as described below and click OK. The connection settings and all in app configuration will be saved for the next start of RTT Viewer.
Connection Settings
RTT Viewer can be used in two modes:
- Stand-alone, opening an own connection to J-Link and target
- In attach mode, connecting to an existing J-Link connection of a debugger.
In stand-alone mode, RTT Viewer needs to know some settings of J-Link and target device.
Select USB or TCP/IP as the connection to J-Link. For USB a specific J-Link serial number can optionally be entered, for TCP/IP the IP or hostname of the J-Link has to be entered.
Select the target device to connect to.
This allows J-Link to search in the known RAM of the target. Select the target interface and its speed. If known, enter the address of the RTT Control Block in the target application. Otherwise leave as 0 for auto detection.
In attach mode, RTT Viewer does not need any settings.
Select Existing Session. For attach mode a connection to J-Link has to be opened and configured by another application like a debugger or simply J-Link Commander. If the RTT Control Block cannot be found automatically, configuration of its location has to be done by the debugger / application.
The Terminal Tabs
RTT Viewer allows displaying the output of Channel 0 in different "virtual" Terminals. The target application can switch between terminals with SEGGER_RTT_SetTerminal() and SEGGER_RTT_TerminalOut(). RTT Viewer displays the Terminals in different tabs.
All Terminals
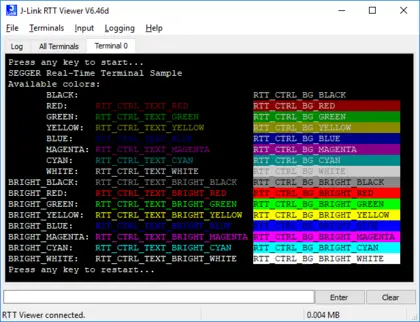
The All Terminals tab displays the complete output of RTT Channel 0 and can display the user input (Check Input -> Echo input... -> Echo to "All Terminals"). Each output line is prefixed by the Terminal it has been sent to. Additionally output on Terminal 1 is shown in red, output on Terminals 2 - 15 in grey.
Terminal 0 - 15
Each tab Terminal 0 - Terminal 15 displays the output which has been sent to this Terminal. The Terminal tabs interpret and display Text Control Codes as sent by the application to show colored text or erase the screen. By default, if the RTT application does not set a Terminal Id, the output is displayed in Terminal 0. The Teminal 0 tab can additionally display the user input. (Check Input -> Echo input... -> Echo to "Terminal 0") Each Terminal tab can be shown or hidden via the menu Terminals -> Terminals... or their respective shortcuts as described below.
Sending Input
RTT Viewer supports sending user input to RTT Down Channel 0 which can be read by the target application with SEGGER_RTT_GetKey() and SEGGER_RTT_Read().
Input can be entered in the text box below the Teminal Tabs.
RTT Viewer can be configured to directly send each character while typing or buffer it until Enter is pressed (Menu Input -> Sending...).
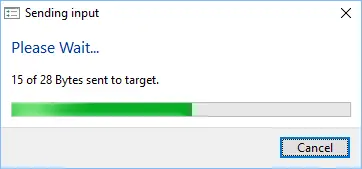
In stand-alone mode RTT Viewer can retry to send input, in case the target input buffer is full, until all data could be sent to the target via Input -> Sending... -> Block if FIFO full.
Logging Data
Additionally to displaying output of Channel 0, RTT Viewer can log data which is sent on RTT Channel 1 into a file.
This can for example be used to send instrumentalized event tracing data. The data log file contains header and footer and the binary data as received from the application.
Logging can be started via Data -> Start Logging.... Logging is only available in stand-alone mode.
Menus and Shortcuts
| Menu entry | Description | Shortcut |
|---|---|---|
| File | ||
| -> Exit | Close connection and exit RTT Viewer. | Alt-Q |
| Terminals | ||
| -> Add next terminal | Opens the next available Terminal Tab. | Alt-A |
| -> Close active terminal | Closes the currently active Terminal Tab. | Alt-C |
| -> Show Log | Opens or Closes the Log Tab which shows some general information. | Alt-L |
| -> Terminals... | ||
| --> Terminal 0 - 9 | Opens or closes the corresponding Terminal Tab. | Alt-0 - Alt-9 |
| --> Terminal 10 - 15 | Opens or closes the corresponding Terminal Tab. | |
| Input | ||
| -> Clear input field | Clears the input field without sending the entered data. | Button 'Clear' |
| -> Sending... | ||
| --> Send on Input | If selected, entered input will be sent directly to the target. | |
| --> Send on Enter | If selected, entered input will be sent when pressing Enter. | |
| --> Block if FIFO full | If checked, RTT Viewer will try to send all input to the target when the target input buffer is full. | |
| -> End of line... | ||
| --> Windows format (CR+LF) | Select the end of line character to be sent on Enter. | |
| --> Unix format (LF) | Select the end of line character to be sent on Enter. | |
| --> Mac format (CR) | Select the end of line character to be sent on Enter. | |
| --> None | Select the end of line character to be sent on Enter. | |
| -> Echo input... | ||
| --> Echo to "All Terminals" | If checked, sent input will be displayed in the All Terminals Tab. | |
| --> Echo to"Terminal 0" | If checked, sent input will be displayed in the Terminal 0 Tab. | |
| Data | ||
| -> Start logging... | Start logging data of Channel 1 to a file. | F5 |
| -> Stop logging | Stop logging data and close the file. | Shift-F5 |
| Help | ||
| -> About... | Show version info of RTT Viewer. | F12 |
| -> J-Link Manual... | Open the J-Link Manual PDF file. | F11 |
| -> RTT Webpage... | Open the RTT webpage (segger.com/jlink-real-time-terminal.html) | F10 |
| Right-click on Tab | ||
| -> Clear Terminal | Clear the displayed output of this Terminal Tab | |
Using "virtual" Terminals in RTT
For virtual Terminals the target application needs only Up Channel 0.
This is especially important on targets with low RAM. If nothing is configured, all data is sent to Terminal 0. The Teminal to output all following via Write, WriteString or printf can be set with SEGGER_RTT_SetTerminal() .
Output of only one string via a specific Terminal can be done with SEGGER_RTT_TerminalOut(). The sequences sent to change the Terminal are interpreted by RTT Viewer. Other applications like a Telnet Client will ignore them.
Using Text Control Codes
RTT allows using Text Control Codes (ANSI escape codes) to configure the display of text. RTT Viewer supports changing the text color and background color and can erase the Terminal. These Control Codes are pre-defined in the RTT application and can easily be used in the application.
Example 1:
SEGGER_RTT_WriteString(0, RTT_CTRL_RESET"Red: "RTT_CTRL_TEXT_BRIGHT_RED"This text is red.
"RTT_CTRL_TEXT_BLACK""RTT_CTRL_BG_BRIGHT_RED"This background is red. "RTT_CTRL_RESET"Normal text again.");
Result:
Red: This text is red. This background is red. Normal text again.
Example 2:
SEGGER_RTT_printf(0, "%sTime:%s%s %.7d\n",
                      RTT_CTRL_RESET,
                      RTT_CTRL_BG_BRIGHT_RED,
                      RTT_CTRL_TEXT_BRIGHT_WHITE,
                      1111111
                      );
//
// Clear the terminal.
// The first line will not be shown after this command.
//
SEGGER_RTT_WriteString(0, RTT_CTRL_CLEAR);
SEGGER_RTT_printf(0, "%sTime: %s%s%.7d\n",
                      RTT_CTRL_RESET,
                      RTT_CTRL_BG_BRIGHT_RED,
                      RTT_CTRL_TEXT_BRIGHT_WHITE,
                      2222222
                      );
Result:
Time: 2222222


